On this page
Generic Graphics: Draw Pins, Lines, Areas and Shapes
Not every mark on a military map is a military symbol. Generic Graphics are free-drawing graphics — pins, lines, areas, text labels, rectangles, ellipses and circles — for the things MIL-STD-2525 has no symbol for: a sketched route, a highlighted area, a note on the map.
Overview
Generic Graphics sit in the same symbol library as the military symbols, so you place them the same way and they live on a MilX layer next to your other graphics. What sets them apart is styling: their colour, line style, arrowheads, line width and text colour are yours to choose, through the Free-Format Options of the Symbol Editor. Standard symbols do not offer that, because their look is fixed by the standard.
As with any graphic, a layer has to be active before you can place one — see MilX Layers.
Where to find them
Open Add new MSS Symbol, stay on the Symbol Gallery tab and choose the area Function-Specific Symbols. The group Generic Graphics is at the top:
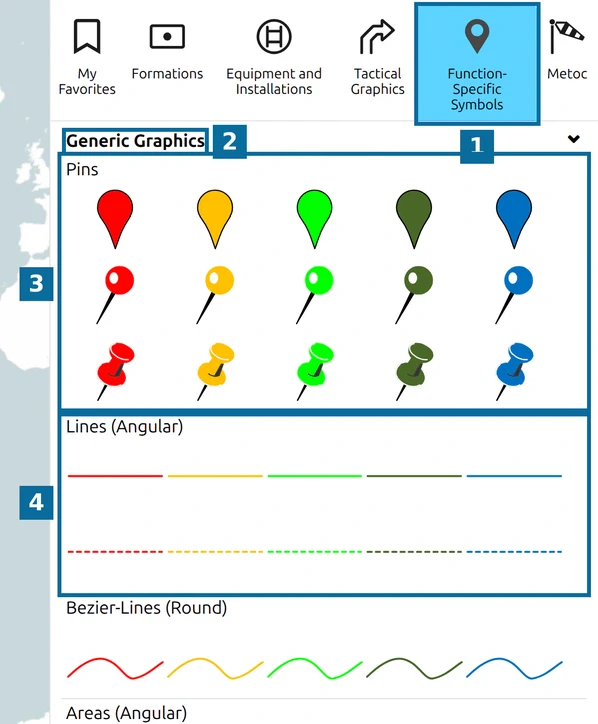
- The gallery area Function-Specific Symbols.
- The group Generic Graphics.
- Pins — map pins, round pins and push pins in red, yellow, green, dark green and blue.
- Lines (Angular) — straight-segment lines, solid or dashed, in the same five colours.
Further down follow Bezier-Lines (Round) (smoothly curved lines), Areas (Angular), Bezier-Areas (Round), Texts, Rectangles, Ellipses and Circles. Each tile is a starting style — you can change colour and line style afterwards, so pick the shape first and worry about the look later.
Draw a line
- Click a line in Lines (Angular). The tile is highlighted.
- Click the map once for each corner point of the line. While you draw, the line shows its points as small round handles.
- Press Space to finish the line.
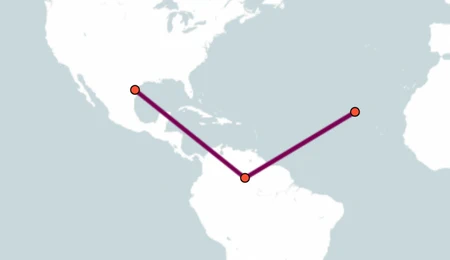
To change the course of a finished line later, select it and move, add or remove its points as described in Edit Multi-Point Tactical Graphics.
Draw the other shapes
Every Generic Graphic is placed the same way — pick its tile, then click the map — but the shapes need different numbers of clicks:
| Shape | How to draw it |
|---|---|
| Pins, Texts | One click places it. |
| Lines (Angular), Bezier-Lines (Round) | Click once per point, at least two. Finish with Space, a right-click or the editor’s finish button; Esc cancels. A Bezier line is drawn as a smooth curve through the points you click. |
| Areas (Angular), Bezier-Areas (Round) | As for lines; the area closes itself between the last and the first point. An angular area needs at least three points. |
| Circles | Two clicks: the centre, then a point on the edge. The circle is finished after the second click. |
| Ellipses, Rectangles | Three clicks. For an ellipse, the first click is the centre, the second sets one radius and the rotation, the third sets the other radius. The shape is finished after the third click; adjust it afterwards like any other graphic. |
Pins and Texts carry a text of their own. Their label is entered through the free-text modifier, which opens a small text editor with sizes, bold, italic and lists — see the free-text modifier on Symbol Editor.
Style it with Free-Format Options
Select the graphic on the map and open the MSS Symbol Editor. Next to Affiliation and Operational Condition, Generic Graphics have a palette button — Free-Format Options:
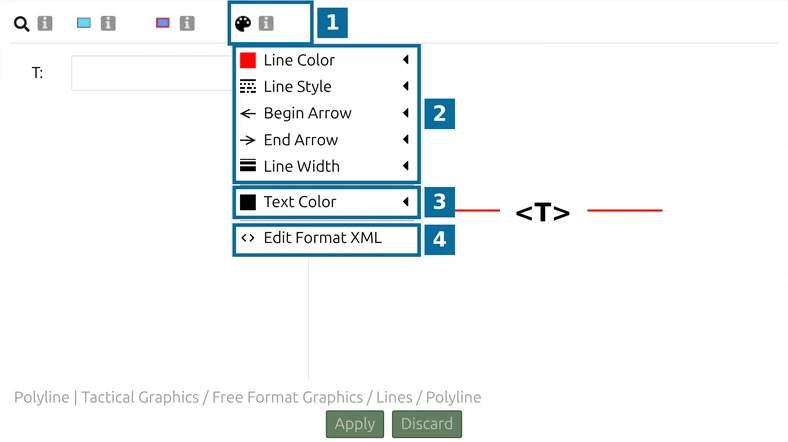
- Free-Format Options opens the styling menu.
- The line settings:
- Line Color.
- Line Style — Solid, Dash, Dot, Dash Dot, Dash Dot Dot, or Clear (invisible).
- Begin Arrow and End Arrow — None, Line, Filled or Hollow arrowhead at either end.
- Line Width — preset widths from 1 to 20 pt, or a value of your own.
- Text Color — the colour of the text label (the T: field of the editor), which is drawn on the line.
- Edit Format XML — the same settings as a line of text, for copying a style exactly from one graphic to another.
The menu shows only the settings that fit the shape — the line above has no fill:
| Shape | Free-Format settings |
|---|---|
| Lines | line colour, style, width and arrowheads; text colour |
| Areas, Circles, Ellipses, Rectangles | line colour, style and width; fill colour, style and transparency (in %); text colour |
| Pins | fill colour (the body of the pin); text colour and font |
| Texts | all of them, including the text font — the border and fill of the text box follow the line and fill settings |
Every setting also offers a Default Value, which returns it to the style of the tile you started from. Click Apply to write the new look to the graphic — see Apply and Discard.