On this page
SDZ Builder: Safety Distance and Surface Danger Zones
map.army has a complete SDZ builder. SDZ stands for both safety distance zone, the name the app uses, and surface danger zone, the doctrinal term. Attach one to any firing position on the map and shape it to your weapon: maximum distance, sector of fire, direction of fire, ricochet areas and vertical hazard. Draw the range fan, rotate it, drag it into shape on the map, save it as a weapon type and hand that type to the rest of your unit. It is included in every edition, free and Pro.
What you can build: a safety distance zone (SDZ)
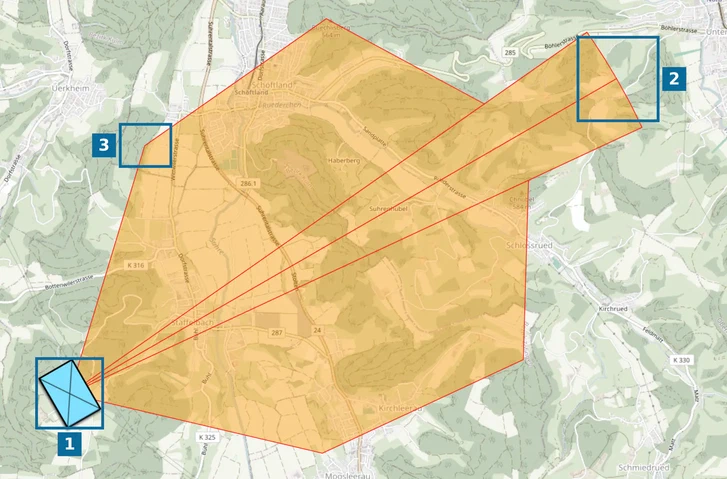
A safety distance zone is the ground that must be kept clear around a firing position, because a round can reach it directly or after a ricochet. Every part of it is a parameter you set:
| Part | Control in the Point List | Range |
|---|---|---|
| Maximum distance of the impact area | Distance (m) | 0 to 1 000 000 m |
| Sector of fire | Angle (°), a half-angle on each side of the direction of fire | 0 to 180° |
| Direction of fire | Direction, the symbol’s own direction | 0 to 360° |
| Ricochet areas, one wing on each side of the sector | Ricochet Area with Length, Area, Start Angle and End Angle | angles 0 to 90° |
| Vertical hazard | Vertical Hazard (m) | 0 m and up |
| Colours | Fill Color and Line Color | any colour |
In the screenshot: (1) the firing position, (2) the impact sector, the classic fan, (3) a ricochet wing.
Example: a machine-gun position in 60 seconds
- Place a unit symbol at the firing position.
- Open the Point List and set Direction to 45.
- Tick Safety Distance Zone and pick M240 (7.62 mm) in Saved Type. The fan, both ricochet wings and the vertical hazard are filled in at once.
- Check the zone against the ground, then export a PDF for the range briefing.
How the zone is shaped
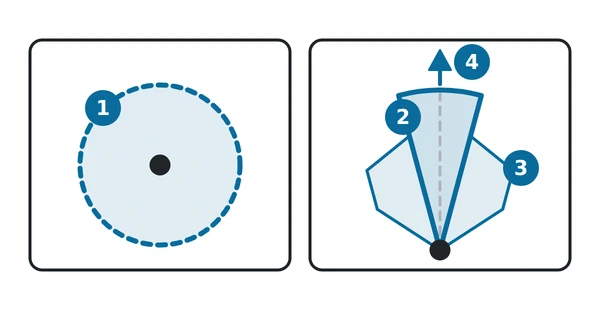
In the diagram: (1) a range ring, which only shows how far a weapon reaches; (2) the impact sector of a safety distance zone; (3) its two ricochet wings; (4) the direction of fire.
- The impact area is a sector, a fan. It reaches Distance along the direction of fire and opens by Angle on each side of it. Angle is a half-angle: Angle 5 gives a 10° sector, Angle 12 a 24° sector, and Angle 180 a full circle.
- The direction of fire turns the whole zone. The zone follows the symbol’s direction, in 2D and in 3D.
- Ricochet adds a wing on each side of the sector. Each wing runs along the edge of the sector for Length and is Area wide; Start Angle and End Angle set how steeply its two ends leave the edge. The wings are drawn only when all four ricochet values are greater than 0.
- Vertical Hazard records how high the danger reaches, for airspace coordination. It is saved with the zone but not drawn on the map.
Built on published range-safety doctrine
The zone follows the surface-danger-zone layout of published range-safety doctrine: Figure B-1, SDZ for direct-fire weapons without explosive projectiles, and its Table B-1, in the US Army range-safety pamphlet DA PAM 385-63. If you know that figure, you know the parameters already. Each of its terms maps 1:1 to a field:
| Doctrine term | Field in map.army |
|---|---|
| Dispersion area, 5° either side of the gun-target line | Angle 5 (the half-angle) and the direction of fire |
| Distance X | Distance |
| Distance Y | ricochet Length |
| W | ricochet Area, the width of the wing |
| P | Start Angle |
| Q | End Angle |
| Vertical hazard | Vertical Hazard |
map.army does not certify a zone against any national standard. Every value is a parameter, so you enter the official figures of your own nation or range, save them as a type and share them. For symbols and data exchange, map.army works with established standards: MIL-STD-2525 symbology, NATO Vector Graphics (ADatP-4778) and MilX.
Build your range fan step by step
- Place the symbol that represents the firing position, or select one that is already on the map. It must be a single-point symbol, such as a unit, a weapon or an equipment symbol, and for a direction of fire it must be one that supports a direction.
- Open the Point List: click View and edit graphic’s coordinates in the main window. See The Point List.
- Set the direction of fire in the Direction field, in degrees. The field sits directly above the zone controls. You can also set it in the MSS Symbol Editor’s direction modifier, or drag the symbol’s direction handle on the map, which shows the angle while you drag. The zone follows live.
- Tick Safety Distance Zone. A default zone appears at once: Angle 12 (a 24° sector), Distance 1000 m, Vertical Hazard 300 m.
- Pick a weapon in Saved Type, or keep Custom… and type your own Angle and Distance.
- For ricochet, tick Ricochet Area and set Length, Area, Start Angle and End Angle. A freshly ticked ricochet starts at 700 m, 100 m, 25° and 45°.
- Set Vertical Hazard, Fill Color and Line Color as needed.
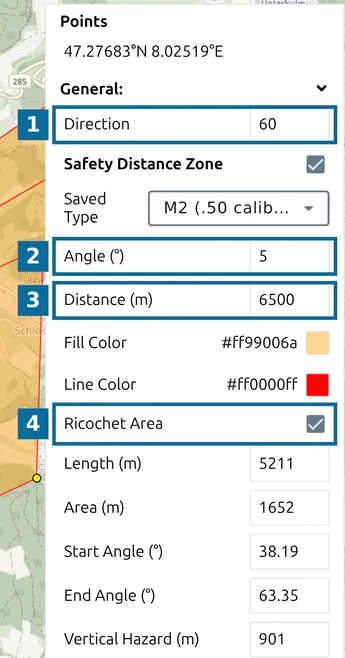
In the screenshot: (1) Direction, the direction of fire; (2) Angle; (3) Distance; (4) Ricochet Area and its four values.
Every change goes onto the undo history, so Ctrl + Z reverses it like any other edit.
Shape the zone directly on the map
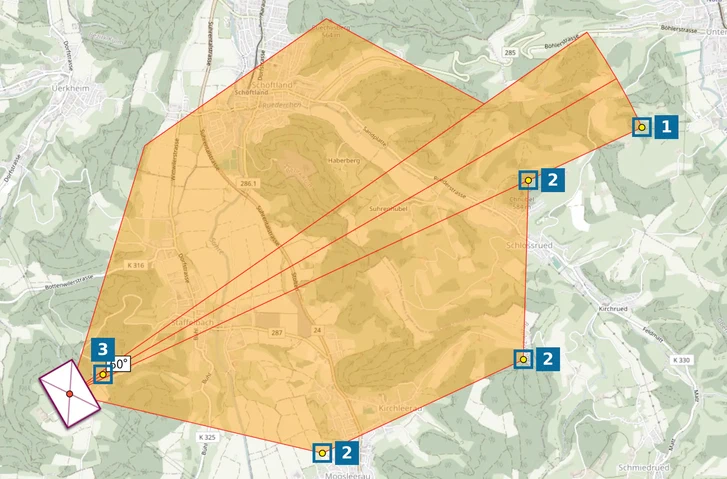
You do not have to type every value. While the symbol is selected for editing, the zone shows drag handles on its right-hand side, as seen looking along the direction of fire (a zone firing south has them on its west side):
- (1) The corner of the sector sets Distance and Angle together. Drag it out for more range, sideways for a wider sector.
- (2) The three ricochet corners set the ricochet Length, Start Angle and End Angle; the wing width follows.
The symbol has its own handle as well:
- (3) Its direction handle turns the direction of fire, and the whole zone turns with it.
Values snap to whole metres and whole degrees, and the Point List shows the new numbers as you drag. While you turn the symbol, the map shows its direction in degrees next to the handle.
The zone in 3D
Switch to the 3D view and the zone is drawn there too, laid on the terrain, so you can see how the impact area and the ricochet wings fall across hills and valleys.
Ready-made weapon types
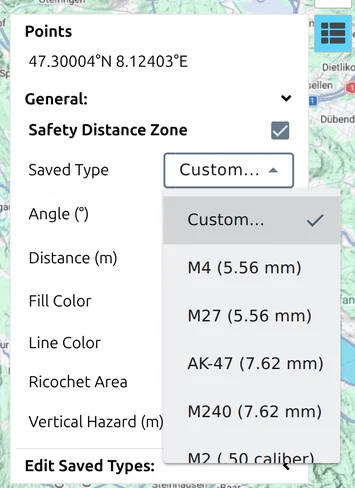
map.army ships five weapon types in the Saved Type list. Custom… is selected whenever the current values match none of them. All five are taken from Table B-1 of DA PAM 385-63, impact medium earth or water, use Angle 5 (a 10° sector) and have ricochet switched on:
| Saved Type | Table B-1 row | Distance (X) | Ricochet length (Y) | Ricochet area (W) | Start angle (P) | End angle (Q) | Vertical hazard |
|---|---|---|---|---|---|---|---|
| M4 (5.56 mm) | 5.56 mm M855 Ball | 3437 m | 2029 m | 462 m | 34.20° | 22.40° | 325 m |
| M27 (5.56 mm) | 5.56 mm M855 Ball | 3437 m | 2029 m | 462 m | 34.20° | 22.40° | 325 m |
| AK-47 (7.62 mm) | 7.62 mm Ball | 4100 m | 4073 m | 1461 m | 43.54° | 38.90° | 706 m |
| M240 (7.62 mm) | 7.62 mm Ball | 4100 m | 4073 m | 1461 m | 43.54° | 38.90° | 706 m |
| M2 (.50 caliber) | .50 caliber M2 Ball | 6500 m | 5211 m | 1652 m | 38.19° | 63.35° | 901 m |
Note how far the 7.62 mm ricochet reaches, 4073 m against a 4100 m maximum, and how fast the vertical hazard grows with calibre: the .50 calibre type reaches 901 m. If you are planning anything that flies, that number matters more than the footprint on the map.
Your own weapon types: build once, share with the unit
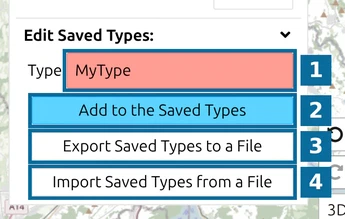
The five built-in types are a starting point. Build the zones for your own weapons, ammunition and targets, name them, and they join the Saved Type list. Example: on a range with steel or concrete targets, Table B-1 gives a different 7.62 mm row than for earth: Distance (X) 4100 m, Length (Y) 4053 m, Area (W) 861 m, Start Angle (P) 20.04°, End Angle (Q) 75.54°, Vertical Hazard 447 m. Start from M240 (7.62 mm), enter all six values and save the result as your own type. Change every value: the angles differ as much as the distances. The Edit Saved Types group is collapsed by default; click its heading to open it.
- Shape the zone as you need it.
- Type a name in Type and click Add to the Saved Types. The button appears once you have typed a name.
- Click Export Saved Types to a File to save the whole list as
SDZ_SavedTypes.json. - Hand the file out. Everyone else clicks Import Saved Types from a File and has the same types.
To drop a type, select it and click Remove from the Saved Types. This is how a unit distributes its agreed weapon and ammunition set: define the values once and nobody retypes ballistic data.
Your zone travels with your MilX file
The zone is stored on the symbol itself, inside the MilX layer, together with the symbol’s direction. Save the layer, open it again a week later, and the zone is back exactly as you left it:
| Route | Zone kept? |
|---|---|
Save the layer as .milxlyz and open it again | Yes, unchanged: every value, including ricochet, vertical hazard and colours |
| Share link | Yes, unchanged: a share holds the MilX layer |
| PDF or image export | Yes: drawn into the output like the rest of the map |
| KML export | Yes, as a drawing: the fan, a centre line along the direction of fire, both ricochet wings and the colours. The zone itself shows the direction of fire, so the symbol’s direction arrow is left out. Not carried: the type name and the vertical hazard |
| NVG export | No: the zone is left out |
| Another MilX application | The data is in the file, but other applications do not draw it |
Use KML to show the zone in Google Earth or a GIS for an overview. For planning, the map.army map, the MilX file and a PDF or image export are the authoritative output. For a reader without map.army, send a PDF or image export. See also What survives a save or a share.
Where to go next
- The Point List: the panel the zone controls live in.
- Range rings: for weapon reach alone, without sector or ricochet.
- Measure distances and areas: check a zone against real ground.
Last updated: