On this page
The Layer-Manager: create, save, load and delete layers
The Layer-Manager is where every MilX layer operation happens in map.army: adding a layer, and saving, loading or deleting layers. This page covers opening it and each of those operations in turn. For what a MilX layer actually is, how the .milxlyz format behaves, and how to set a layer active so you can draw on it, see MilX Layers.
The Layers panel at a glance
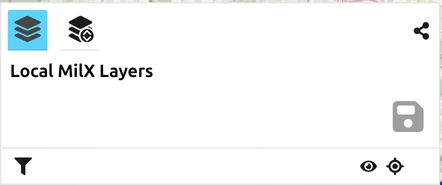
Before you open the Layer-Manager, the plain Layers panel already carries five controls of its own along its top edge:
| Control | What it does |
|---|---|
| Open Layer-Manager | Switches the panel into editing mode — everything under Opening the Layer-Manager below |
| Share Military Map | Creates a share link from your layers — see How to create a share |
| Download layers as a MilX file | Saves layers straight to a local file without entering the Layer-Manager |
| Filters | Narrows the list to Only Visible, Only Approved or Only Editable layers |
| Show / Hide all and Zoom all layers | Applies visibility or zoom to every layer at once |
Filters change what you can reach, not just what you can see. With Only Approved set, an unapproved layer is absent from the list — so you cannot drag symbols onto it or activate it either. If a layer you expect is missing, clear the filter before assuming anything is wrong.
Opening the Layer-Manager
Every operation below starts the same way.
- Click Layers — the top-left button in the main window — to open the Layers menu. It opens on Local MilX Layers, with Vector Layers and Image Layers collapsed beneath.

- Click Open Layer-Manager — the third icon at the top of the panel — to switch the panel into editing mode.
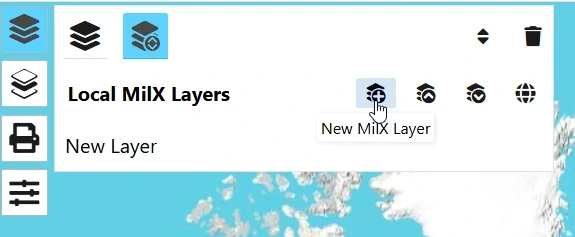
Click Close Layer-Manager — the second icon — to return to the plain layer list. Two mode switches sit above the toolbar, Reorganize Layers and Delete Layers, alongside an up/down glyph that is a state indicator rather than a button.
| Toolbar control | What it does |
|---|---|
| New MilX Layer (first icon) | Adds a new, empty MilX layer to the bottom of the list |
| Load (second icon) | Opens a local .milxlyz or .milxly file and adds its layers to the map |
| Download (third icon) | Switches the list into selection mode so you can save layers to a local file |
| Export/Import in other formats (globe, fourth icon) | The route to every non-MilX format — KML and, where it is enabled, NVG. See KML / KMZ Export and NVG |
| Reorganize Layers (above the toolbar) | A mode switch. Turn it on to drag layers into a new order or into another MilX group; while it is on, a banner reads Reorganize Mode is active: Layers can be moved or rearrange in or between groups using drag and drop. Rows also gain Move the layer to the top, Move the layer to the bottom and Copy and paste the layer with all symbols |
| Delete Layers (trash, above the toolbar) | Turns on delete mode, giving every layer row its own trash icon — and the group header a trash of its own that removes every layer in that group |
Controls on each layer row

Every layer in the list carries its own controls, whether or not the Layer-Manager is open:
| Control | What it does |
|---|---|
| Pencil or checkmark | Appears on the selected layer only, and says which kind it is: a pencil for an active, editable layer — the one new symbols land on — or a checkmark for a layer that is selected but read-only. Click the layer’s name to select it — in the plain list. With the Layer-Manager open, clicking the name of a renamable layer starts an inline rename instead. See MilX Layers |
| Filled dot (left of the name) | Marks a layer whose edits have not been written back to a MilX file. In map.army this dot is what you see — per-layer saving is not offered here, so there is no save button on the row. The same signal drives Download layers as a MilX file at the top of the panel, which stays dimmed until at least one layer is dirty |
| Show / Hide | Hides this layer from the map without deleting it |
| Zoom layer | Zooms the map to fit everything on this layer |
| Settings | Opens the layer’s own settings: Opacity, Approved, Read-Only, the Layer Name, and Override Symbol Format. Opacity is the one most people are hunting for — it fades one layer back without touching the rest |
Reorder by dragging — but only in Reorganize mode. Turn Reorganize Layers on first. Without it, dragging a row does nothing and clicking a layer’s name starts a rename instead, which is the usual reason reordering “does not work”. Order matters on the map: layers higher in the list draw on top of those below.
Dragging also moves a layer between MilX groups — from Local MilX Layers into Shared MilX Layers, say. It does not reach Vector Layers or Image Layers: those hold a different kind of layer entirely and are not part of the Layer-Manager, so a MilX layer cannot be dropped into them. A group that does not accept new layers refuses the drop.
While Reorganize is on, each row also offers Move the layer to the top and Move the layer to the bottom — both jump straight to the end of the list rather than stepping one position — and Copy and paste the layer with all symbols, which duplicates a layer and everything on it.
The Approved checkbox in the same dialog switches the layer to black-and-white presentation — the layer and every symbol on it. The setting is written into the MilX file itself, so an approved layer stays approved when someone else opens it, in map.army or in any other MilX consumer. One exception on screen: the graphic you are currently editing keeps its editing highlight, so a symbol under the cursor is not black and white. See Work with symbols on MilX layers.
Creating a layer

- Open the Layer-Manager as described above.
- Click New MilX Layer — the first icon in the toolbar. A layer named New Layer is appended to the bottom of the list.
- Click Close Layer-Manager to return to the layer list.
Name layers for the part of the situation they carry — Blue_Phase2, Red_Phase1 — rather than leaving several called New Layer; the name is what you will see when saving, loading and sharing, and it becomes part of the saved filename.
Saving layers to a local MilX file
- Open the Layer-Manager.
- Click the download icon — third in the toolbar. The list switches into selection mode.
- Click each layer you want to include; selected rows highlight. Use all to take everything and unselect to start over.
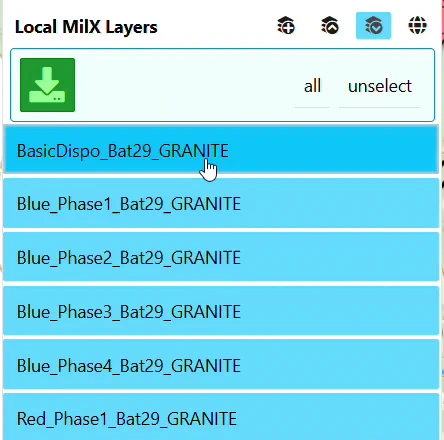
- Click the green download button. If nothing is selected, map.army warns Select the layer(s) to download. rather than saving an empty file.
- Confirm the save. Depending on your download settings the file either lands straight in your download folder or the browser asks where to put it. Whatever your browser calls the file type in that dialog comes from your operating system, not from map.army; the file itself is saved with the
.milxlyzextension.
map.army generates the filename for you: the layer’s own name when you save one layer, or LayerCollection when you save several, followed by a timestamp so repeated saves never overwrite each other. The timestamp follows your own date-format, locale and time-zone settings, so its shape is not the same for everyone. See MilX Layers for how the name is built. For the step-by-step with more screenshots, see Export Overlays.
.milxlyz is your real safety net.Loading layers from a local MilX file
- Open the Layer-Manager.
- Click the load icon — second in the toolbar.
- Pick a local
.milxlyzor.milxlyfile and confirm.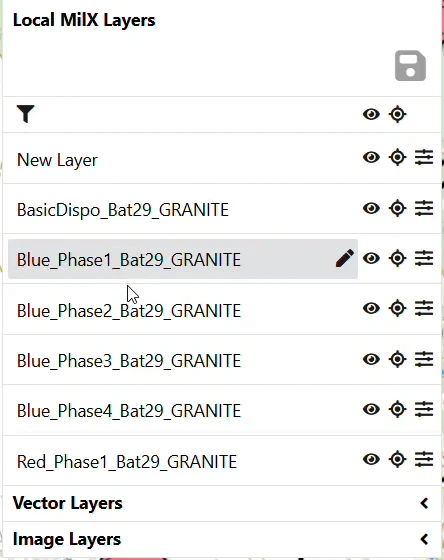
Loaded layers are always added to whatever you already have open — existing layers are never overwritten or replaced, and a layer you created in this session survives the load. That is what lets you combine several saved files into one situation, and it is why loading a collection alongside your working layer is safe. For the step-by-step, see Import Overlays.
Deleting a layer
- Open the Layer-Manager.
- Click the Delete Layers icon at the top of the panel — its tooltip reads Delete Layers: Enable to delete individual layers. This is a mode switch, not an immediate delete: every layer row gains its own trash icon.

- Click the trash icon on the row you want to remove.
- If the layer holds unsaved changes, map.army lists them and asks you to confirm — click Delete to remove the layer, or Cancel to keep it. If there is nothing unsaved, there is no prompt: the layer goes straight away. So do not treat the dialog as a safety net you will always get.

The confirmation dialog offers Don’t show this message again. Leave it unticked — it is the only warning you get that a layer holds unsaved work, and it only appears at all when there is unsaved work to warn about.
If you do delete a layer by mistake, Ctrl + Z brings it back, symbols and all. That undo is per-session and capped, so it will not help you after a reload — but in the moment, a deleted layer is recoverable rather than gone.
The working cycle
Putting it together:
- Create a layer for each part of the situation, and name it.
- Activate the layer you want to draw on — check for the pencil; see MilX Layers.
- Draw your symbols onto it — see Manage MilX Overlays.
- Save to a local
.milxlyzfile early and often, especially before risky edits. - Load the local file later — on the same machine or another — to keep working, with the layers added on top of the current map.
- Delete the layers you no longer need, once they are saved.
Saving and loading always work against a local file on your own device. When you need a copy that lives server-side instead — for sharing, or as an extra backup — create a MilX Share instead of (or in addition to) saving locally; see How to create a share.