On this page
Import a Military Overlay: MilX, Vector and Image
This chapter shows how you can import your MilX layers. Or you can import your own layers from vector or bitmap graphics.
Quick answer — bring in an overlay or map data
- An overlay from another map.army user or unit (
.milxlyz): Layer-Manager, Load MilX. See MilX Layers. - An overlay from a NATO C2 system (
.nvg): the globe button, Export/Import in other formats. See NVG. - GIS data, a route or a track (KML, GPX, GeoJSON, SHP): Vector Layers. See Vector Layers.
- A scanned or georeferenced map: Image Layers. See Image Layers.
Overview
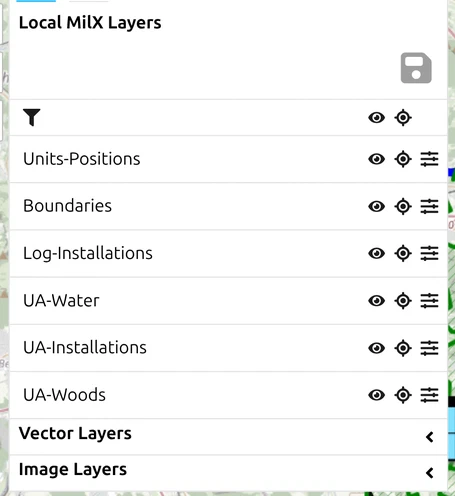
The following types of data layers can be imported into map.army:
| Type | Description |
|---|---|
| MilX | Tactical Situation which was ceated in map.army and exported. |
| Vector Graphic | Any graphic in vector format |
| Image Graphic | Any raster image |
Two things an import can do that surprise people
Above roughly 6000 symbols in the project, newly added layers are hidden. map.army warns you, and then switches every layer added since the last check to invisible to keep the map usable. Your data is intact and the layers are in the Layer-Manager — they are simply not drawn. Switch the ones you need back on. If a large import “did not arrive”, check visibility before you import it again.
A layer whose name is already taken is renamed on import. map.army appends to the name to keep it unique and shows a notification. Two imports of the same file therefore produce two layers, not one merged one.
MilX Layers
Files with the extension .milxlyz — or the uncompressed .milxly, which loads just the same — were exported from the generator for military situations. These can be imported again, displayed and further processed.
If you have already created layers on your map, the imported layers are always added. Existing layers are not changed. If an imported layer has the same name as one already open, it is added under a numbered name, for example New Layer 1, and a notification tells you so.
NATO Vector Graphics (NVG)
map.army also reads NVG — NATO Vector Graphics, the NATO standard for exchanging a tactical picture between different systems. It arrives as a layer you can carry on editing, and it can be written back out again. It has its own page: NVG import and export.
Vector Layers
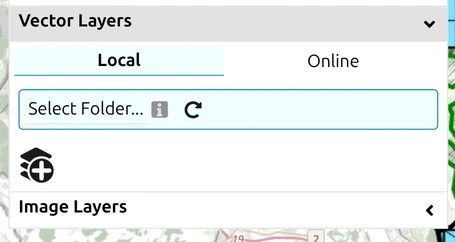
You can import vector graphics as layers and display them in the situation map. The panel has two tabs, and a layer belongs to one or the other:
- Local — files from your own machine.
- Online — a layer fetched from a URL. Only these travel with a shared project, because a share carries the address the layer came from rather than its content. See Share vector and image layers.
Supported formats
A Format row above the file picker offers four buttons — KML, GPX, JSON, SHP:
| Format | Extensions | What it is |
|---|---|---|
| KML | .kml | Keyhole Markup Language (e.g. from Google Earth) |
| GPX | .gpx | The GPS Exchange Format, for tracks, routes and waypoints |
| JSON | .json, .geojson | GeoJSON, the open format for geographic data — both extensions are the same format |
| SHP | .shp | Esri shapefile, the common GIS vector format |
Loading a file normally sets the format for you from its name. The one case where you have to set it yourself is a URL with no file extension — a download link like …/export?id=4711 tells map.army nothing, so pick the format before you load.
Three ways to load a layer
- A single file — Select File…, and choose it.
- A whole folder — Select Folder…, offered where your browser provides the file-system directory picker (today, Chrome and Edge on the desktop). This is how a layer comes back later: map.army writes a small settings file next to each layer file, recording its opacity, colour and visibility, and picks the folder up again at the next start. Only files that already have such a settings file are loaded — a folder of files map.army has never seen loads nothing, with no message.
- A URL — fill in URL and a Name. Your browser fetches it, which is why a server that does not permit cross-origin requests will fail here even though the address works in a browser tab.
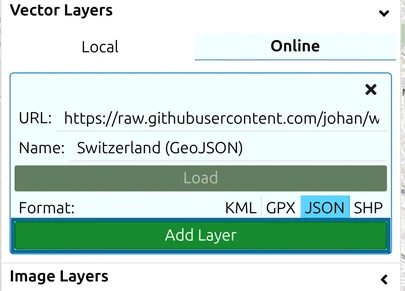
If a load fails, the message tells you which of the three went wrong: “Could not load the file … please check if the URL is correct. If the issue persists, check the CORS (Cross-Origin Resource Sharing) settings on your server” is the URL route; “Incorrect Format” means the extension is not one of the five above.
.kmz cannot be loaded directly — unzip it first. KMZ is a zipped KML, and the vector import reads the file as text, so it accepts .kml only. Rename or extract the archive to get the .kml inside it and load that. (Going the other way is different: an export to KML always writes a .kmz — see KML / KMZ Export.)A shapefile is read as the single .shp file
map.army reads the .shp on its own. A shapefile is really a set of files, and the two that are not read matter:
- The
.dbfholds the attributes, so feature names and properties do not come across. - The
.prjholds the projection, so coordinates are taken as WGS84 longitude and latitude.
A shapefile in a national projection therefore lands in the wrong place, with no error to tell you so. If your data is projected, convert it to WGS84 GeoJSON in your GIS before loading it — that also keeps the attributes.
Turn a vector layer into a MilX layer
A vector layer is a backdrop: you can see it and restyle it, but you cannot edit its features as military symbols. The Convert button on the layer’s row changes that — an icon-only button whose tooltip reads Convert the layer to MilX and add it to the project. It works for all four formats.
Each feature becomes one MSS graphic, chosen by what the feature is: a point for a placemark or waypoint, a line for a polyline, route or track, an area for a polygon. Line and area styling is carried across where the source declares it — line colour and width, fill colour and transparency — so a styled KML arrives looking much as it did. GPX routes and tracks each get their own fixed colour instead, since GPX has no standard colour of its own.
What does not come across:
- The feature’s description — balloon text, popup content and the icon a KML names through an
href. Every converted feature carries a standard MSS symbol, not the source’s own icon. - Anything beyond 15 characters of the name. The feature name becomes the symbol’s text modifier, which MIL-STD-2525 limits, so “Bridge over the Aare, southern crossing” arrives truncated. Shorten names in the source file if they have to stay readable.
You end up with both layers. Converting creates a new MilX layer and leaves the vector layer exactly where it was, so the same features are drawn twice — once as the backdrop and once as symbols. Hide or remove the vector layer once you are happy with the conversion.
The resulting MilX layer is an ordinary editable layer: it accepts the full tactical-graphics editor and exports as .milxlyz.
The generic symbol the conversion assigns is not permanent. Select a converted graphic, open the MSS Symbol Editor, and use Base Symbol… in the modifier menu to search for the symbol it should actually be. To retag a batch, set one graphic correctly, copy it, select the rest on the map and paste — they all take that symbol at once. Converted points swap freely; a converted line or area can only become another free-form line or area, and the app refuses anything incompatible rather than changing it silently. See Symbol Editor.
KML import notes
KML files of moderate size import reliably; very large vector inputs may exceed per-symbol point limits — split into smaller files if needed.
What you can change after a vector import
An imported vector layer is not fixed in place. Its row in the Layers panel offers:
| Control | What it does |
|---|---|
| Opacity | A slider, for fading the layer back so your military symbols stay readable on top of it |
| Colour options | Restyles the imported features, which is the fix when a source file’s own colours did not survive the import |
| Layer Source | A read-only readout in the same panel, showing the URL an online layer came from or the file name of a local one — the way to find out what a layer you were sent actually is |
| Download | Saves this one layer back out on its own |
| Convert (icon only) | Turns the vector layer into a MilX layer, so its features become editable military symbols — see above |
| Show / hide | The eye, for taking the layer off the map without removing it |
| Remove | The bin, tooltip Remove the layer |
Opacity is the one worth reaching for first: an imported route or boundary set often arrives far more prominent than the situation you are drawing over it.
Style and colour preservation
map.army parses geometry and standard style properties from vector imports, but per-feature colour and styling attributes from third-party tools may not be preserved:
- GPX does not have a standardised colour property in the core schema. Some tools (Garmin, Scribblemaps) write a non-standard
topografix:colorextension that map.army does not parse — imported features fall back to the default style. - JSON / GeoJSON likewise have no schema-mandated style attribute; styles vary by producer and most extensions are not parsed.
- KML is the best case:
<LineStyle>colour and width and<PolyStyle>fill are honoured, including styles a placemark reaches through a<StyleMap>. What is not honoured is the<IconStyle>href— a custom icon becomes a standard MSS symbol.
So a KML authored with proper line and fill styles keeps its appearance through both the import and a conversion to MilX, while a GPX track or a bare GeoJSON arrives in the default dark grey whatever the source tool showed you. If colour matters and the format cannot carry it, set it afterwards with the layer’s own colour options.
Image Layers
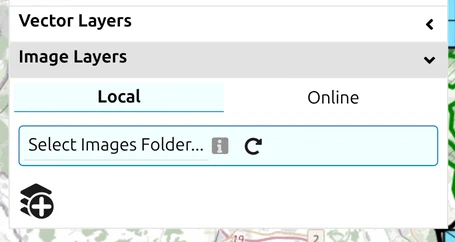
An image layer lays a picture — a scanned or photographed map, an aerial photograph, a sketch — over the base map. map.army accepts these formats:
| Ending | Format |
|---|---|
| *.png | Portable Network Graphics — raster graphics format with lossless data compression |
| *.jpg, *.jpeg | JPEG — the most common photo format |
| *.bmp | Windows Bitmap |
| *.webp | WebP — compressed image format developed by Google |
| *.svg | Scalable Vector Graphics — drawn as a picture, not as editable vector shapes |
How to add an image layer
- Open Layers, expand Image Layers and click the Add Layer icon.
- Choose where the image comes from:
- Local — Select File… picks one image from your device. In Chrome and Edge on the desktop you can instead pick a whole folder with Select Images Folder…; see Save the placement for next time for what that adds.
- Online — enter the image’s URL: and a Name:, then click Load. The server that hosts the image must allow other sites to load it; map-tile servers usually do.
- Under Geo Reference, place the image on the map — see Place the image below.
- Click the green Add Layer button. Until you do, the image is only staged in the dialog and not part of your map — this final step is the one most often missed, and the cause of “my image layer is not showing” reports.
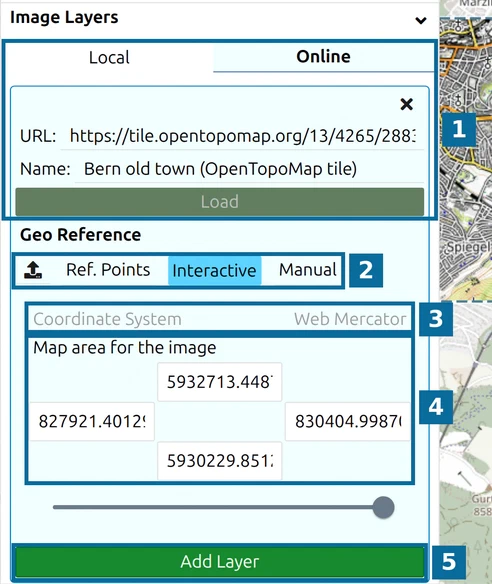
- Where the image comes from — Local or Online, here an online map tile with its URL:, Name: and Load.
- The placement modes: the upload icon (from a file), Ref. Points, Interactive and Manual.
- Coordinate System of the coordinates shown below it.
- Map area for the image — the coordinates of the image’s top, left, right and bottom edges.
- Add Layer adds the image to your map.
The slider above Add Layer sets how opaque the image is.
Place the image
As soon as the image has loaded, Interactive is selected and the picture is laid over the middle of the map, inside a dashed frame with coloured handles:
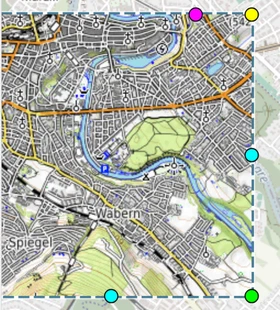
| Drag… | to… |
|---|---|
| inside the picture | move it |
| the green handle (bottom-right corner) | resize it, keeping its proportions |
| a cyan handle (middle of the right or bottom edge) | stretch only the width or only the height |
| the yellow handle (top-right corner) | rotate it |
| the magenta handle (on the top edge) | make it more or less transparent while you place it |
Map area for the image follows along and shows where the picture sits, in the map’s own coordinate system (Web Mercator, in metres).
The other placement modes:
- From a file — the upload icon left of Ref. Points. The quickest route when the image came with a world file (
.pgw,.jgw,.j2w,.tfw,.wld— see Export as Georeferenced Image) or with a placement file you saved earlier from map.army (.json, see below). Load the image first, then click the upload icon and pick the file — a placement file picked before the image has loaded is ignored. A world file says nothing about its coordinate system, so choose the right one under Coordinate System before you click Add Layer. - Ref. Points — fix the picture by three points you can recognise on both the image and the map. See the next section.
- Manual — type the edges of the image yourself.
Place an image with reference points
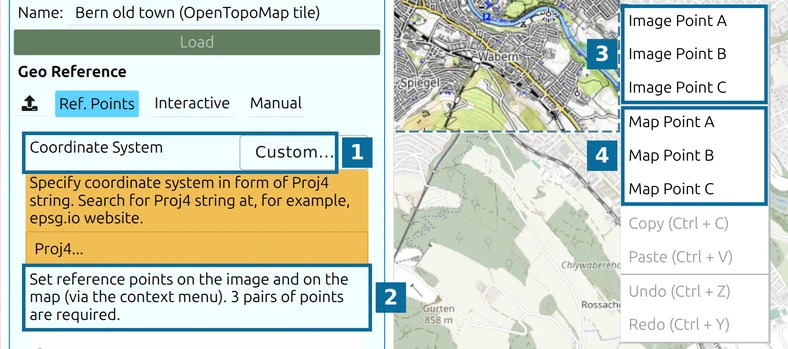
When you have no world file — a scanned map, a photographed overlay — you can georeference the image yourself: tell map.army which point on the picture lies on which point of the ground, so that it lines up with the map underneath.
- Load the image and click Ref. Points. Coordinate System switches to Custom…; choose a coordinate system from the list — or paste a Proj4 definition under Custom… — before you add the layer.
- Right-click a feature you can recognise on the image — a road junction, a bridge, a building corner — and choose Image Point A.
- Right-click the same feature on the map and choose Map Point A.
- Repeat for B and C. As soon as all three pairs are set, the picture is placed. Each point is shown as a labelled cross that you can drag to correct it.
- Click Add Layer.
Save the placement for next time
After Add Layer, the image’s row under Image Layers carries a download icon, Save placement of image overlay (download as file for reuse). It saves a small placement file named after the image — Bern.png gets Bern.png.json. Next time, load the image, click the upload icon and pick that file, and the picture lands exactly where it was.
If you work from a folder (Select Images Folder…), map.army reads and writes these .json files next to the images by itself, and the download icon is not needed.
Image layers and the .milxlyz format
Image-layer placement coordinates are written to a settings file named after the layer file and placed next to it — Bern.png gets Bern.png.json, one per layer. Vector layers get the same treatment. To preserve an image layer across sessions, keep the layer file and its settings file together — when you re-open the picker and select the same directory, map.army restores the original placement automatically. An image without a settings file still loads — you then place it again.
Image layers are not embedded inside .milxlyz exports. When you share or save your work as MilX, the image-layer content is left behind. To share a map that includes an image layer, either share the image file separately, or use an online-source image layer — see Share Online-Source Layers.
Image layers for custom graphics and fictional maps
Image layers are the supported workaround for any use case that needs non-standard graphics on the map:
- Scanned campaign maps or historical maps as a background.
- Fictional-nation maps for wargaming or roleplaying scenarios.
- Custom emblems, unit crests, or other artwork on top of the MIL-STD-2525 symbols.
These graphics ride on a separate image layer; they are not embedded into individual military symbols (the MIL-STD-2525 / JC3IEDM exchange format cannot carry arbitrary images on symbols). For amplifying icons that do attach to a symbol, use an Icon Extension Modifier — see Symbols → Symbol Editor.
Removing a layer you loaded from a folder
A second quirk affects load order: if you open a .milxlyz first and then add an image layer in the same session, the image layer may not be picked up automatically on the next session reload. The reliable workflow is to add the image layer first, position it, then load any MilX layers on top. If you hit a state where the image layer does not return on reload, re-add it manually from the saved image and its settings file.
Image layer vs. base-map switching
Importing an image layer is supported in the public web app and is the right tool for adding a custom backdrop to a map.
Switching the base map itself to a private WMTS / WMS provider (so the underlying map tiles change) is a different mechanism. One such service can be passed in the link — see Connect Your Own Map Service. Having the app’s whole map list come from your own providers, selectable in the Options panel, is configured per deployment; see the FAQ entry on the professional version.
Last updated: