On this page
Plan a Military Exercise Map and Export It to PDF
This page walks through a full exercise-planning session in map.army — from opening a fresh tab to handing a printed PDF to your team. It links out to the detail pages for each step rather than repeating them; treat it as the connecting thread.
Quick answer — an exercise map in five steps
- Set the base map and coordinate grid for your area of operations.
- Create one layer per party: own forces, enemy forces, control measures.
- Place unit symbols and tactical graphics.
- Save the layers as
.milxlyz. - Export a PDF for the briefing, or share a link.
What you will end up with
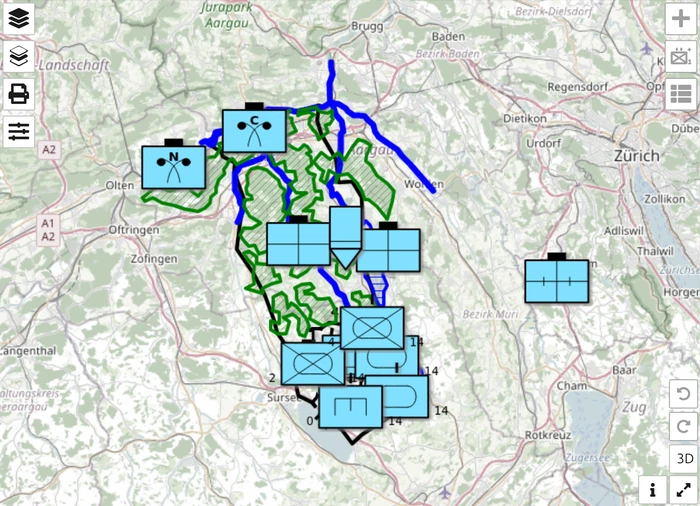
By the end of this walkthrough you will have:
- A 2D map centred on your area of operations with an appropriate base map and coordinate grid.
- Three working layers — blue, red, and graphics / control measures — each carrying the right MIL-STD-2525 symbols.
- A
.milxlyzarchive of your work and a PDF export ready to brief.
Time budget: about 20 – 30 minutes the first time, much less after that.
1. Open the app and orient yourself
Open map.army in a browser and let the PWA load. The first time it can take 10 – 20 seconds; press Ctrl + F5 if it stalls.
Seven side-function buttons frame the map — four down the left edge, three down the right:
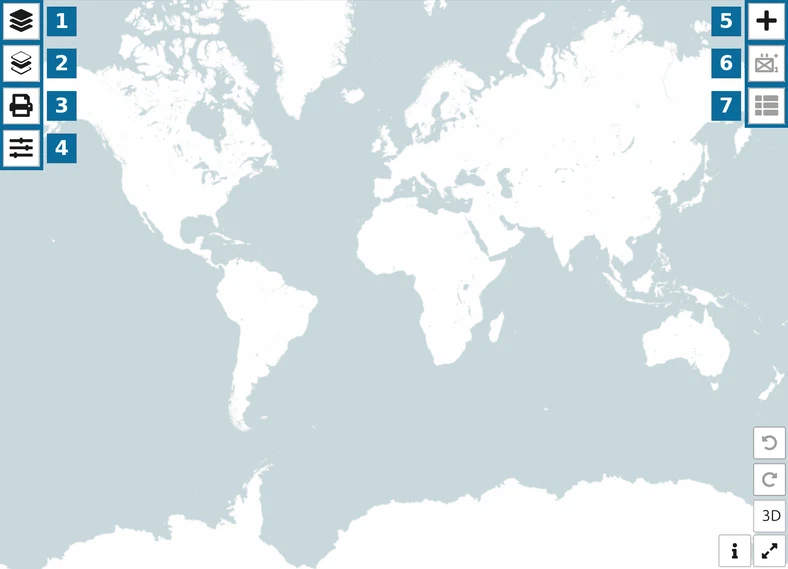
- 1 — Layers: the layer list, where layers are created, activated and saved (steps 3 and 6).
- 2 — Active/Selected Layer: jumps to whichever layer you are currently drawing on.
- 3 — Print map or Export to PDF: the output panel (step 7).
- 4 — Options: every application setting (step 2).
- 5 — Add new MSS Symbol: opens the Symbol Gallery (step 4).
- 6 — MSS Symbol Editor: modifiers and attributes for the selected symbol (step 4).
- 7 — View and edit graphic’s coordinates: the point list (step 5).
The Introduction page has a button-by-button reference. Undo and Redo sit in the bottom-right corner next to the 3D button, which switches to the read-only 3D view — stay in 2D edit mode for the rest of this walkthrough.
2. Configure the map view
Click Options and set up the visual context before you start drawing. Options is a single scrolling panel divided into groups, not a set of tabs — so everything below is in the same panel, reached by scrolling.
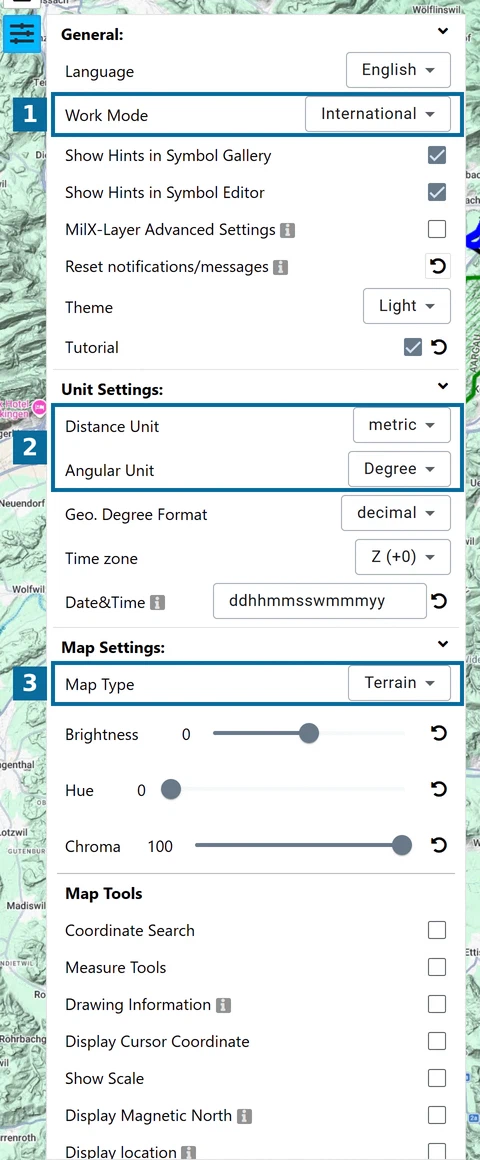
- 1 — Work Mode. Leave it on International for MIL-STD-2525 symbology. Extended adds the Swiss military and civil-protection sets; see General Options.
- 2 — Unit Settings → Distance Unit / Angular Unit. Set the units your team gives orders in.
- 3 — Map Settings → Map Type. Pick the base map. OpenTopoMap is the cleanest topographic backdrop for exercise planning; see Map display settings for the full list.
Scroll further down the same Map Settings group to its Coordinate Settings section and pick the grid you plan to give orders against — MGRS for NATO tactical work, UTM for distance-heavy navigation.
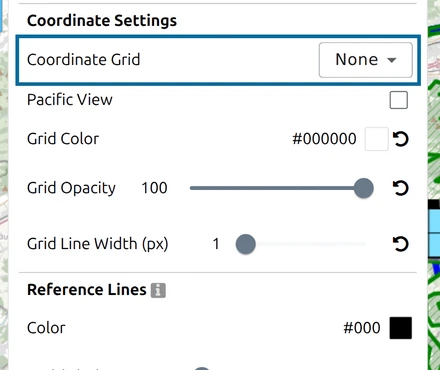
The same section sets the grid colour, opacity and line width. See Map coordinate system settings and the deep dive in Coordinate Grid.
Close Options and pan / zoom to your area of operations.
3. Lay out the layers
A clean exercise map uses several layers rather than one. Click Layers to open the layer list: it lists every MilX layer in the project, followed by the Vector Layers and Image Layers groups.
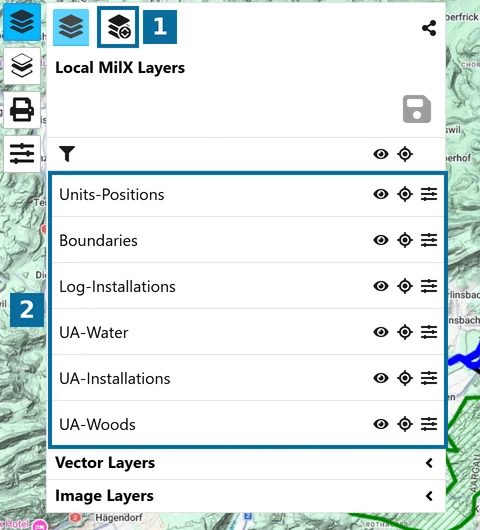
- 1 — Open Layer-Manager, the second glyph in the menu’s top row. Creating, saving, reordering and deleting layers all happen in the manager.
- 2 — the layer list. Clicking a layer’s name makes it active; a pencil icon then appears on that row. Only one layer is active at a time, and that is the layer new symbols land on.
Open the Layer-Manager. Its group header carries the actions that create and save layers:
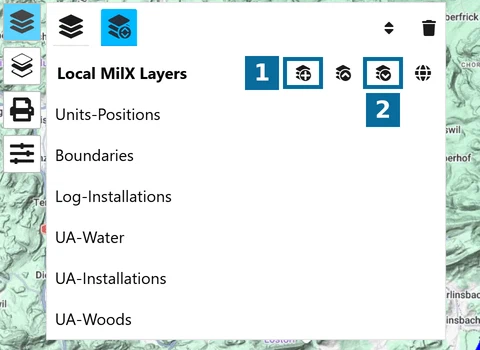
- 1 — New MilX Layer adds an empty layer to the group. Click it once for each layer you need.
- 2 — Save as MilX, used in step 6.
A common starting set:
| Layer name | Holds |
|---|---|
| Blue forces | Friendly units, planned positions, sustainment graphics |
| Red forces | Hostile / opposing units and known templated positions |
| Control measures | Phase lines, boundaries, objectives, range rings |
To rename a layer, go back to the Layers menu and open that layer’s settings — the sliders icon at the right of its row. The panel that expands holds the Layer Name field, along with Opacity, Read-Only, the Approved status and Override Symbol Format. See Layer-Manager for the full set of layer controls.
.milxlyz.4. Place your unit symbols
For each side, activate the right layer and place units one by one.
- In the Layers menu, click the name of the layer you want to draw on and check that the pencil icon appears beside it. Add new MSS Symbol stays inert while no layer is active.
- Click Add new MSS Symbol and find the unit.
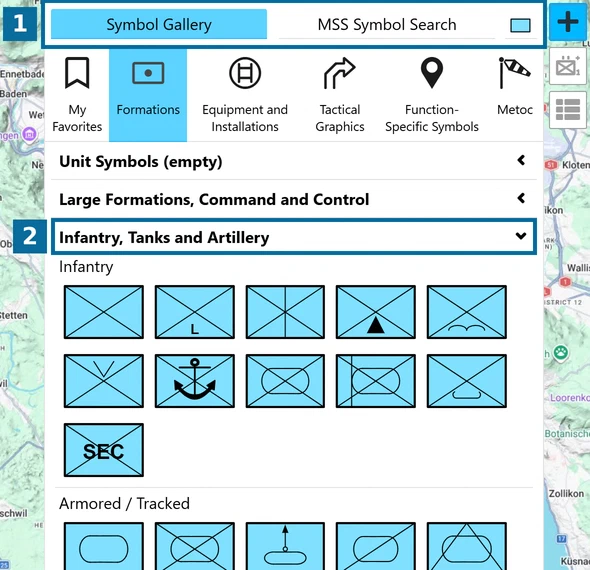
- 1 — two ways in: Symbol Gallery browses by category, MSS Symbol Search finds a symbol by name.
- 2 — categories expand in place. Formations, Equipment and Installations, Tactical Graphics, Function-Specific Symbols and Metoc sit alongside your My Favorites.
The Symbol Gallery page covers searching and the My Favorites shortcut.
- Place the symbol on the map.
- With the symbol selected, click MSS Symbol Editor.
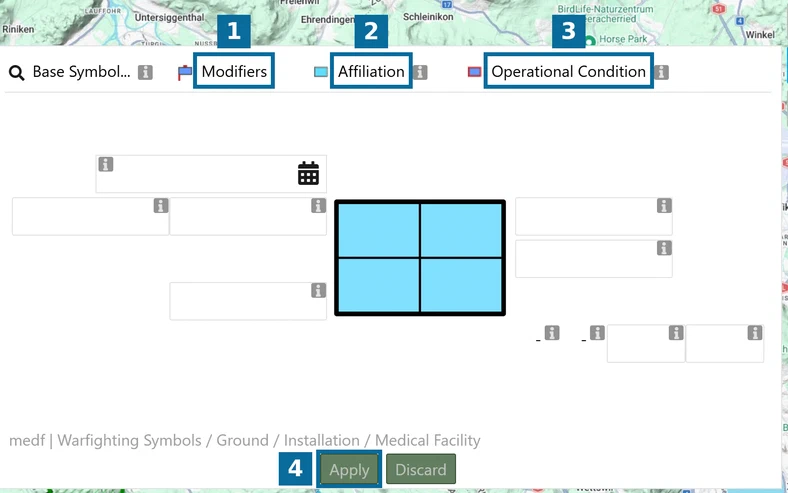
- 1 — Modifiers: the unit designator, higher formation, strength and the rest of the text modifiers, each in the slot where it will be drawn.
- 2 — Affiliation: friendly, hostile, neutral or unknown.
- 3 — Operational Condition: the symbol’s status.
- 4 — Apply commits the change, Discard throws it away. The line under the symbol shows the full hierarchy you have selected.
See Symbol Editor, then repeat for the next unit. The Add Your First Military Symbol page is the slowed-down version of this step if you have not placed a symbol before.
5. Add tactical graphics and control measures
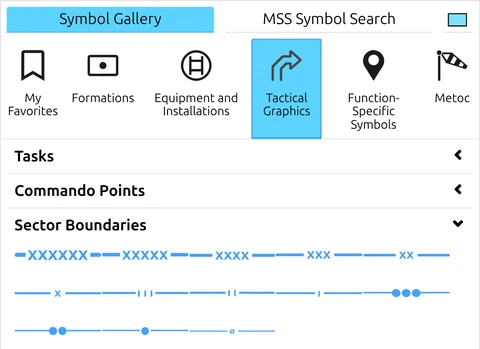
Activate your Control measures layer. Tactical graphics are placed from the same gallery and then shaped with the point list and on-map editing, which open from View and edit graphic’s coordinates:
- Phase lines, boundaries — pick the line or area symbol from Tactical Graphics, click each control point in turn, then press Space to confirm the drawing.
- Range rings — see Range rings for the dedicated workflow.
- Distance and area — switch on Measure Tools under Options → Map Settings → Map Tools, then check spacing on the map; see Measurement tool.
- Magnetic declination for compass-based movement — switch on Display Magnetic North in that same Map Tools section; see Magnetic declination.
The other keys the geometry editors use are listed on Keyboard Shortcuts.
6. Save your work
Before doing anything else with the map, save the layers to disk. The hosted app keeps no per-user state on the server — see Project Model for why this matters.
- Open the Layers menu, then Open Layer-Manager.
- Click Save as MilX on the group header. The manager switches into selection mode.
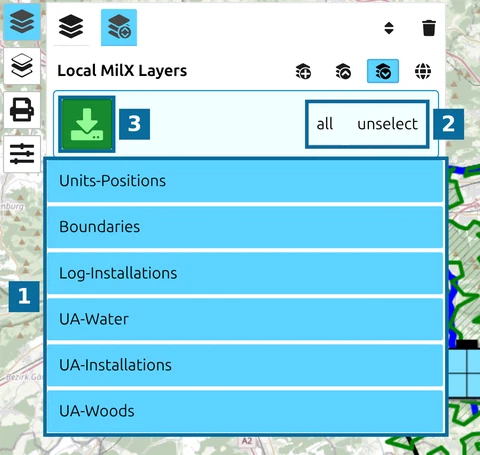
- 1 — tick the layers to write. Saving one file per side keeps the briefing packages separate; saving them all together gives you one archive for the whole exercise.
- 2 — all selects every layer in the group, unselect clears the selection.
- 3 — the green download button writes the
.milxlyz.
Full details: Export Overlays. Treat this as your “save as” and re-save after material changes.
7. Share or export for briefing
Two output paths, depending on the audience.
A printed or PDF briefing
Click Print map or Export to PDF.
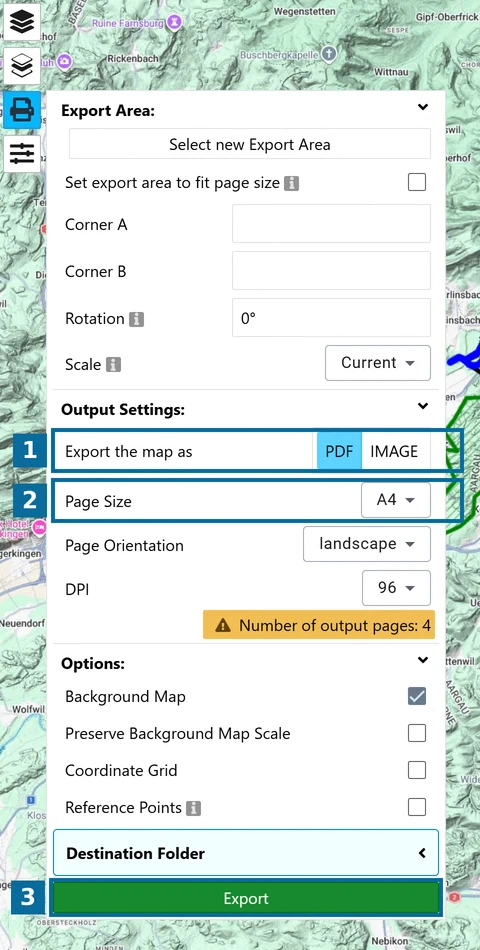
- 1 — Export the map as: PDF for a hand-out, IMAGE for a slide.
- 2 — Page Size, with Page Orientation and DPI beneath it. The panel reports how many pages the current export area will need, so watch that number as you change the paper settings.
- 3 — Export writes the file to the Destination Folder.
Set the export area before you export: Select new Export Area lets you draw it, or tick Set export area to fit page size, and Rotation and Scale fine-tune it. Under Options, Background Map, Coordinate Grid and Reference Points decide what the output carries.
See Create an export for paper-size, base-map licence and georeferencing options, and Print a project — read its Verify the printed scale section if the printed grid has to match a real scale such as 1:25 000.
A shared situation
If colleagues will keep working on the map:
Open the Layers menu and click Share Military Map in its top row.

Pick the share mode — Read Only for briefings, Edit & Copy for collaborative drafting, Edit & Overwrite for live multi-user editing. See How to create a share.
For a two-sided exercise where each player must only see their own forces, use the three-share pattern from Wargaming with map.army.
Where to go next
- Layer-Manager — creating, reordering and deleting layers, and moving them between groups.
- Symbols on Layers — moving symbols between layers, finding them with the filter, marking a layer Approved.
- Import Overlays — adding a scanned map as a background, or pulling in an existing
.milxlyz. - Free vs Pro — what the hosted demo deliberately leaves out.
- Keyboard Shortcuts — the small set of shortcuts the app uses.
Last updated: